Moisture issues don’t always announce themselves with a dramatic leak. In many Sydney homes, water can creep in, linger, and gradually cause damage behind external wall systems — including polystyrene cladding where a lightweight wall build-up is finished with a coated surface and relies on junctions and transitions to shed water effectively. Because these systems often have a rendered finish, early clues may show up as subtle surface changes before you see a clear internal stain.
This guide is designed to help you spot early warning signs, understand common reasons moisture becomes trapped behind cladding (including polystyrene-based external wall systems), and decide what to do next — without relying on repeated patching that may cover symptoms while the moisture pathway remains active.
Why does moisture gets trapped behind cladding in Sydney
Sydney’s weather is a stress test for external walls:
- Wind-driven rain during storms can push water sideways into weak points
• Hot sun and UV can degrade sealants and coatings over time
• Coastal salt air can accelerate corrosion of some metal edges and fixings (more noticeable nearer the coastline)
• Temperature swings can contribute to movement at joints, corners, and around openings
Most wall systems are designed to manage water by shedding it, draining it, and allowing it to dry. When any part of that chain is compromised, moisture can get behind the outer surface and become trapped.
It’s also worth remembering that Australian building standards intend to prevent water penetration that can create unhealthy or damp conditions and deterioration — this principle is captured in NCC health and amenity provisions for roofs and walls. For general guidance, see: National Construction Code (NCC) – Roof and wall cladding, Health and Amenity.
Why polystyrene cladding can hide moisture (and how the clues show up)
Polystyrene cladding systems are typically lightweight and are commonly finished with a reinforced base coat and a render or textured coating. As with many external wall finishes, moisture may be present behind the surface without obvious signs at first, particularly when water enters at details such as window corners, joints, or roof-to-wall transitions.
For homeowners, that means early indicators are often finish-related rather than a visible leak. Watch for:
• paint blistering or a slightly swollen look in a localised patch
• fine cracking that returns after minor patching
• chalky white staining (efflorescence) that reappears after cleaning
• a drummy/hollow sound when tapping compared to surrounding areas
• musty odours or damp patches inside that correlate with wind-driven rain
The most common places moisture sneaks in
Moisture trapped behind polystyrene cladding (and other rendered external wall systems) often enters at details — places where materials meet, where movement is concentrated, or where water should be directed away — rather than through the middle of a wall.
Focus your attention here first:
- Window and door reveals (especially top corners)
• Flashings (missing, damaged, poorly terminated, or not directing water out)
• Gaps in sealant lines that have shrunk, split, or pulled away
• Cracks at joints, corners, and changes of material
• Roof-to-wall interfaces (eaves, parapets, box gutters)
• Balconies and deck connections
• Penetrations (pipes, cables, fixtures)
Q&A: If my wall looks fine, can water still be getting in?
Yes. Water can travel behind surfaces and show up somewhere else entirely. You might only see the evidence inside the home, or at a low point where moisture collects.
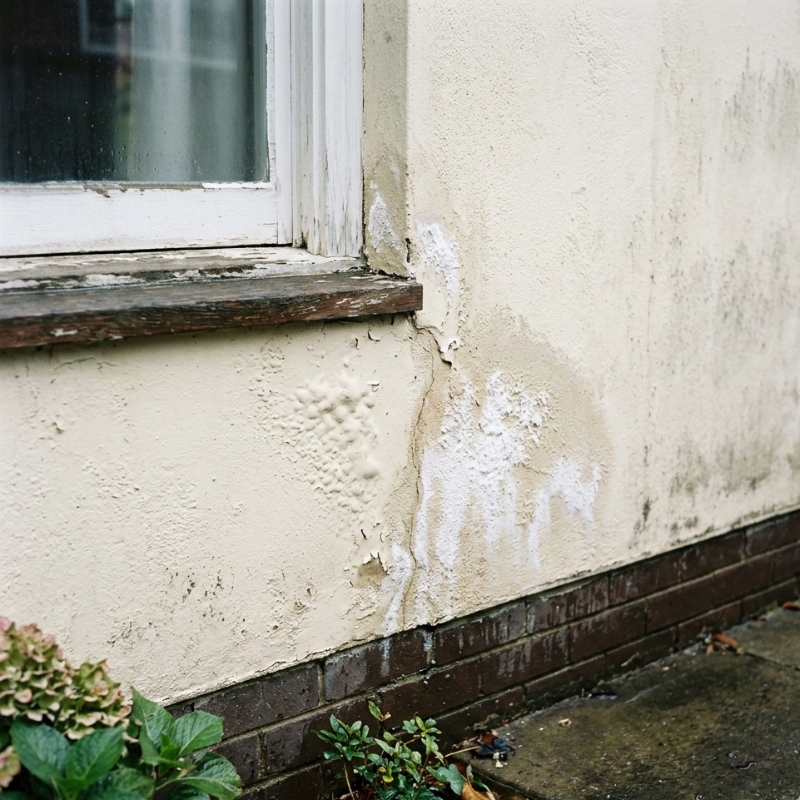
Outside warning signs (what you can see on the exterior)
Blistering, bubbling, or peeling paint
If paint blisters after rain — especially on a sun-facing elevation — trapped moisture is high on the list. Paint struggles to bond to damp surfaces, and heat can turn hidden moisture into vapour pressure that pushes outward.
What to look for:
• bubbles that appear or worsen after wet weather
• peeling that starts at a crack line, corner, or edge
• a “soft” look under the coating that doesn’t match nearby areas
Hairline cracks that “change” with the weather
Not all hairline cracking is serious. But cracks that:
• widen after rain
• reappear soon after patching
• cluster around openings and corners
• follow a line that looks like a joint
…are worth treating as a moisture pathway until proven otherwise.
Efflorescence (white, salty staining)
That chalky white bloom can be a sign that water has moved through the surface and left salts behind as it evaporates. It doesn’t automatically mean major damage, but it’s a reliable signal that moisture has been present.
Soft or “drummy” sounding areas
A hollow sound when tapping can suggest a change in how the surface layer is bonded or supported. On rendered polystyrene cladding, a “drummy” sound can indicate a local change in adhesion or the way the surface layer is bonded. Moisture can be one contributing factor, particularly if the area also shows paint failure, efflorescence, or cracking that follows a joint or corner.
Localised discolouration that doesn’t wash off
Staining beneath windows, at corners, or around penetrations often points to repeat wetting patterns. Pay attention to lines and “drip paths” rather than random marks.
Q&A: Does a “hollow sound” automatically mean the wall is failing?
Not automatically. It’s a clue, not a verdict. The key is whether the area is growing, associated with staining, cracking, or paint failure, or feels soft when pressed. Patterns and progression matter more than a single tap test.
Inside warning signs (what you might notice indoors)
Musty smells that come and go
A musty smell that ramps up after rainfall or humid weather can indicate concealed dampness. If you only smell it in one room or along one wall, take note of that location.
Damp patches, staining, or “tide marks”
Discoloured patches, especially near window corners or at skirting height, can be moisture showing through. Keep in mind: moisture can travel and show up far from the actual entry point.
Mould that keeps returning
If mould returns quickly after cleaning (especially on or near external walls), moisture may be feeding it from within the wall build-up rather than being purely a ventilation issue.
Peeling paint, bubbling plaster, or warping trims
These are common signs that moisture has been present long enough to affect finishes.
Q&A: Why would internal damp show up if the problem is outside?
Moisture can move within wall assemblies and appear internally where airflow is limited or where surfaces are cooler (such as behind furniture, in corners, or near window reveals). That’s why timing (for example, after storms) and repeat location are useful clues.
Leak or condensation? How to tell the difference
Not all dampness is rain getting in. Condensation can mimic leak symptoms — and Sydney’s humid spells can make that more likely, particularly in bathrooms, laundries, and rooms with limited airflow.
Clues it’s more likely water ingress (rain-related)
- It gets worse after storms or wind-driven rain
• The pattern is near openings (windows/doors) or corners
• You see exterior staining or efflorescence in the same zone
• The dampness appears in “bursts” rather than steadily
Clues it’s more likely condensation (indoor moisture-related)
- It’s worse in winter mornings or during humid stretches without rain
• It’s strongest in bathrooms/laundries/bedrooms with closed windows
• You notice window condensation at the same time
• Ventilation changes (fans, dehumidifier, airflow) noticeably reduce it
Q&A: What if it’s both?
That’s common. An external pathway can add moisture, and poor ventilation can prevent drying. Treat it like a moisture management problem, not a single-cause mystery.
A practical homeowner checklist to confirm patterns
You don’t need specialised tools to gather useful information. The goal is to document patterns and avoid accidentally sealing moisture in.
1) Track the timing
For two to three weeks (or after two decent rain events), note:
• date/time of rainfall
• wind direction (roughly)
• when symptoms appear indoors/outdoors
• whether they fade in dry weather
A simple photo log on your phone is surprisingly useful when you’re trying to work out whether the issue is rain-driven.
2) Inspect high-risk zones up close
Focus on:
• the top corners of windows and doors
• sealant lines (look for splits, gaps, shrinkage)
• cracks that run along edges or corners
• junctions where a balcony, awning, or roof meets the wall
3) Look for repeat “signatures”
If the same area shows:
• bubbling paint + a crack line + staining beneath a window
…that’s a stronger moisture story than any one symptom alone.
4) Be cautious with quick surface fixes
Avoid painting, sealing, or patching until you have a clearer sense of whether moisture is active. Cosmetic fixes often fail quickly if the wall is still wet behind the surface.
Q&A: Should I use a moisture meter from the hardware store?
It can help as a rough indicator of internal plasterboard, but it won’t reliably tell you what’s happening behind external finishes. Treat it as one data point, not proof.
What NOT to do if you suspect trapped moisture
When you’re worried about damage, the temptation is to “seal everything.” Unfortunately, that can trap moisture and shift the problem elsewhere.
- Don’t paint over blistering or staining without addressing the moisture source
• Don’t fill cracks and assume it’s solved if they’re part of an active pathway
• Don’t apply waterproofing products over a damp substrate
• Don’t ignore musty smells that correlate with rainfall
• Don’t repeatedly patch the same spot without investigating why it keeps returning
Why details matter in lightweight external wall systems
Lightweight external wall systems (including polystyrene-based systems) are typically built around a simple idea: manage water at the surface, and don’t give it easy pathways at openings and junctions. That’s why early detection matters. If moisture remains trapped, you may see:
- Recurring paint and finish failure
• localised debonding symptoms that gradually spread
• increased risk of internal mould in persistently damp conditions
• deterioration that extends beyond the original entry point
If you want context on what these systems generally include and why junctions matter so much, this overview can help: polystyrene cladding system for Sydney homes.
Where moisture problems often start on rendered cladding
Around windows and doors
Corners are high-stress points. Movement plus aging sealants and coatings can create a small gap that becomes a repeated entry path in storms.
What to look for:
• fine cracking at the top corners of openings
• sealant that’s pulled away from one side
• staining lines below the sill or along the reveal edge
• recurring interior damp at the same opening
At vertical corners and joints
Corners can crack as the building moves. A stable hairline crack might be cosmetic; a crack that grows, reopens after patching, or aligns with staining deserves closer attention.
Roof edges and parapets
Box gutters, parapet caps, and roof-to-wall transitions are common sources of hidden moisture. If you have staining near the top of a wall, look upward first and consider where water could be entering and tracking down behind the surface.
Balcony and deck junctions
Water can track into the wall at connection points, especially where waterproofing transitions are complex. If damp patches show up internally near a balcony door or adjacent wall, don’t rule out this junction.
Q&A: Why do problems show up far from the entry point?
Water follows gravity and surfaces, but it also follows pathways inside the wall build-up. It can pool at a low point, spread laterally, or show up where it finally finds a route to the surface.
Prevention that doesn’t turn your home into a project
Most homeowners don’t want an ongoing maintenance hobby. The aim is simple: reduce exposure and catch small issues early.
Do a seasonal walk-around
After big storm periods (and once again during a dry stretch), do a quick lap:
• scan openings for sealant splits
• check corners for new cracks
• look for new staining lines
• note any areas where paint looks “different” (duller, blistered, chalky)
Keep water away from walls where possible
- Ensure gutters and downpipes drain correctly
• Fix overflow issues quickly
• Manage sprinklers so walls aren’t constantly splashed
• Keep ground levels and drainage sensible near external walls
Monitor typical risk points on rendered polystyrene cladding
If your home has a rendered finish over polystyrene cladding, these checks can help you monitor common risk points:
• sealant lines at windows/doors: look for shrinkage, gaps, or tearing at corners
• hairline cracks at corners and joints: note any that grow or reappear after patching
• staining beneath sills and at lower edges: repeated wetting patterns matter
• coatings condition: chalky, brittle, or peeling coatings can reduce surface protection
If you’re comparing materials or trying to understand where moisture pathways tend to occur, it can also help to read general guidance about polystyrene cladding for external walls so you know which junctions and finishes you’re dealing with.
When to escalate (and why early escalation reduces risk)
This isn’t about panic — it’s about avoiding the loop of “patch, repaint, repeat.”
Consider getting the issue assessed if you have:
• dampness that reliably follows rainfall
• recurring internal mould on or near external walls
• expanding exterior cracking or repeat paint blistering in the same area
• persistent efflorescence or widespread staining
• symptoms clustered around windows/doors or roof transitions
If you’re documenting the issue for a professional, your notes help: photos, dates, which side of the house, whether it followed wind-driven rain, and how fast it dried (or didn’t).
For background on what’s typically involved in wall build-ups and finishes (so you can describe what you have clearly), this is a useful reference point: polystyrene cladding installation.
FAQ
How do I know if moisture is trapped behind my cladding?
Look for patterns: exterior paint blistering, white salty staining, cracks that change with weather, and interior musty smells or damp patches that worsen after rain. A combination of signs is more meaningful than any single symptom.
Is efflorescence always a serious problem?
Not always, but it’s a reliable sign that moisture has been present and has moved through the surface. If it keeps returning after cleaning, treat it as a moisture-management warning.
Why does paint bubble after rain, even if there’s no visible leak?
Moisture behind the surface can weaken adhesion. Heat and sun can then create vapour pressure, pushing outward and causing bubbles or blisters — even when the entry point is elsewhere (often around openings or junctions).
Can I seal the cracks and repaint?
If moisture is active, sealing and repainting can trap water and lead to recurring failure. It’s better to confirm whether the crack is cosmetic or acting as a pathway, and whether drying is actually occurring.
How long does an external wall take to dry after a leak?
It depends on how much water entered, how enclosed the wall build-up is, and the weather. In humid conditions, drying can be slow, and trapped moisture can persist longer than you’d expect.
What are the most common entry points for water behind external walls?
Openings and transitions: windows and doors, flashings, corners, roof-to-wall junctions, balconies, and penetrations for pipes or cables.
Is it possible the issue is condensation, not rain ingress?
Yes. Condensation is more likely when indoor humidity is high and ventilation is limited. If symptoms worsen without rain (especially in winter mornings), condensation may be contributing.
When should I be concerned about mould?
If mould returns quickly after cleaning, appears on or near external walls, or coincides with musty smells and dampness after rain, it’s worth escalating. Persistent moisture is the real issue to solve.