Wall rendering adds a sleek, modern finish to your home, improving its aesthetic appeal and providing additional protection against the elements. However, issues like bubbling can mar this otherwise perfect finish. Understanding how to fix bubbling in wall rendering is crucial for maintaining the integrity and beauty of your walls. Here’s a detailed guide to help you through the process.
How can you identify bubbling in your wall rendering?
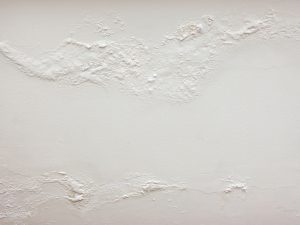
Bubbling in wall rendering is relatively easy to spot, but it’s essential to confirm the issue before proceeding with repairs. Here are the common signs to look out for:
- Visible bubbles: Raised, bubble-like areas on the surface of the rendering.
- Cracking: Fine cracks around the bubbles indicate underlying problems.
- Peeling: Sections of the render may begin to peel away from the wall.
- Sound: Tapping the wall may produce a hollow sound in areas with bubbles.
What causes bubbling in wall rendering?
Bubbling in wall rendering can result from several factors, often related to the application process or environmental conditions. Common causes include:
- Moisture ingress: Water trapped behind the render can cause bubbling as it tries to escape.
- Poor preparation: Inadequate surface preparation can lead to poor adhesion, resulting in bubbles.
- Incorrect mixing: Using the wrong proportions of water and render mix can affect the render’s integrity.
- Application in unsuitable weather: Rendering during extreme weather conditions, like high humidity or excessive heat, can cause bubbles.
- Use of low-quality materials: Inferior materials are more prone to failure and bubbling.
Additionally, understanding bushfire building regulations in Australia is crucial when planning any rendering or construction project, ensuring that your home meets safety standards in high-risk areas.
How can you prevent bubbling in wall rendering?
Prevention is always better than cure, and taking steps to avoid bubbling can save you time and money. Here’s how to prevent it:
- Proper surface preparation: Ensure the wall is clean, dry, and free from loose debris before applying the render.
- Use quality materials: Invest in high-quality rendering materials that are less prone to bubbling.
- Correct mixing: Follow the manufacturer’s instructions for mixing the render to ensure consistency and strength.
- Weather considerations: Avoid rendering in extreme weather conditions to prevent issues related to temperature and humidity.
- Professional application: Hiring experienced professionals ensures that the rendering is applied correctly and evenly.

What tools and materials do you need to fix bubbling in wall rendering?
Before you start fixing bubbling in wall rendering, gather the necessary tools and materials. Additionally, it’s essential to understand acrylic render thickness guidelines to ensure proper application and avoid further issues with your render. Here’s what you’ll need:
- Trowel: This is used to apply and smooth the render.
- Scraper: To remove the damaged render.
- Mixing bucket: This is used to prepare the new render.
- Render mix: Choose a high-quality render mix suitable for your wall.
- Water: For cleaning and mixing.
- Brush: To clean the area before applying the new render.
- Protective gear: Gloves, goggles, and a dust mask for safety.
How do you fix small bubbles in wall rendering?
Fixing small bubbles in wall rendering can often be done without professional help. Here’s a step-by-step guide:
- Identify the affected area: Mark the area with bubbling to ensure comprehensive repair.
- Remove the damaged render: Use a scraper to remove the bubbled sections of the render carefully.
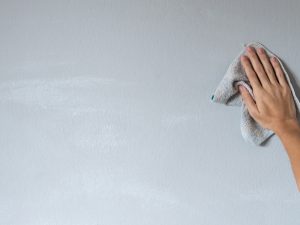
- Clean the area: Brush away any loose debris and dust to prepare the surface for a new render.
- Prepare the render mix: Mix the render according to the manufacturer’s instructions.
- Apply the new render: Use a trowel to apply the new render evenly over the cleaned area.
- Smooth the surface: Smooth the render with a trowel, blending it with the surrounding area.
- Cure the render: Allow the render to dry and cure as per the manufacturer’s recommendations.
To further enhance your home’s aesthetic appeal and value, learn more about our acrylic rendering services, which offer a durable and visually stunning finish.
When should you call a professional to discuss bubbling in wall rendering?
While tiny bubbles can be fixed as a DIY project, some situations warrant professional intervention. Call a professional if:
- Large areas are affected: Extensive bubbling may indicate more profound issues that require expert analysis.
- Persistent bubbling: If bubbles reappear after repairs, there might be underlying problems that need professional attention.
- Structural concerns: If the bubbling is accompanied by cracks or structural damage, a professional should assess the situation.
- Lack of experience: If you’re not confident in your ability to repair the render, it’s best to call an expert to avoid further damage.

How can wall rendering repairs improve your home’s aesthetic and value?
Repairing bubbling in wall rendering does more than fix the surface; it enhances your home’s overall appeal and value. Here’s how:
- Improved appearance: A smooth, flawless render finish enhances curb appeal.
- Increased durability: Proper repairs prevent further damage, extending the lifespan of your render.
- Higher property value: Well-maintained rendering can boost your home’s market value.
- Energy efficiency: Proper rendering adds an extra layer of insulation, improving energy efficiency.
- Weather resistance: Repairs strengthen the render, offering better protection against the elements.
And if you’re planning to repaint after the repair, it’s worth learning about the essential preparation before painting your home to ensure lasting visual and structural benefits. This extra step can also further enhance your home’s aesthetic appeal and value.
What maintenance tips can help prevent bubbling in wall rendering?
Regular maintenance can help prevent bubbling and keep your wall rendering in top condition. Here are a few more tips:
- Regular inspections: Check your render periodically for signs of bubbling or damage.
- Prompt repairs: Address minor issues before they escalate into significant problems.
- Clean the render: Keep the render clean to prevent dirt and moisture buildup.
- Protect from moisture: Ensure proper drainage around your home to prevent water ingress.
- Seasonal care: Follow specific maintenance tips for different seasons to address weather-related challenges.
To keep your walls looking their best, follow maintenance tips for smooth acrylic-rendered walls, ensuring long-lasting beauty and durability.
Enhance your home’s look with Jim’s Rendering Sydney
If you’re facing bubbling in your wall rendering, Jim’s Rendering Sydney is here to help. With expertise in acrylic rendering, cement rendering, and more, our team ensures top-notch service tailored to Sydney’s unique conditions. Don’t let bubbling compromise your home’s beauty—contact Jim’s Rendering Sydney for a free consultation and professional wall rendering solutions that last.


