Rendering can dramatically improve the appearance and durability of a home, but the success of the finished result depends far more on preparation than most homeowners realise. In Sydney, where exterior walls are exposed to humidity, coastal air, heavy rain, and intense summer heat, inadequate preparation is one of the most common reasons render fails prematurely.
This guide is written specifically for homeowners who want to understand what should be checked and prepared before rendering begins. It doesn’t assume trade knowledge, and it doesn’t try to sell services. Instead, it provides a clear, practical checklist to help you identify potential issues early, reduce avoidable risks, and understand when it’s wise to pause and investigate further.
Why exterior wall preparation is critical
Render is not a structural solution. It doesn’t fix unstable walls, ongoing moisture problems, or underlying movement. Instead, it relies entirely on the condition of the surface it’s applied to.
When preparation is rushed or overlooked, common outcomes include:
• Hairline cracks reappearing within months
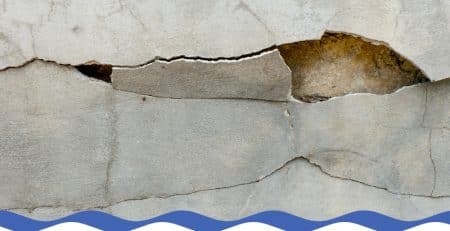
• Larger cracks forming along existing weaknesses
• Render separating from the wall and sounding hollow
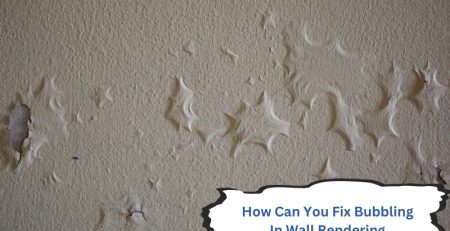
• Bubbling or peeling paint caused by trapped moisture
• Discolouration from salts migrating through the surface
Sydney homes are particularly vulnerable due to:
• High humidity is slowing drying times
• Sudden rain events following hot days
• Coastal salt exposure in eastern and bayside suburbs
• Older brickwork is common across the Inner West and Western Sydney
Homeowners researching high-quality house rendering in Blacktown often discover that preparation quality, not just materials, is what separates long-lasting finishes from those that fail early.
Step 1: Inspect the overall condition of your exterior walls
Begin with a slow walk around the entire house. This first inspection is about observation, not diagnosis.
Look closely at cracks
Cracks are one of the most important indicators of whether a wall is suitable for rendering.
Pay attention to:
• Fine hairline cracks that don’t change width
• Cracks following mortar lines between bricks
• Wide, uneven, or stepped cracks
• Cracks that appear around windows and doors
Hairline cracks are common and often manageable. However, wider cracks or those that continue to grow over time may indicate movement that should be addressed before rendering proceeds.
Check for hollow or loose areas
Lightly tap the wall with your knuckles or a small tool.
• Solid areas sound dull and firm
• Hollow areas produce a sharper, drum-like sound
Hollow sounds may indicate old render separating from the substrate, loose masonry, or failed coatings. Rendering over these areas without proper preparation increases the risk of delamination.
Step 2: Identify moisture and damp issues early
Moisture is one of the most common causes of render failure and should never be ignored.
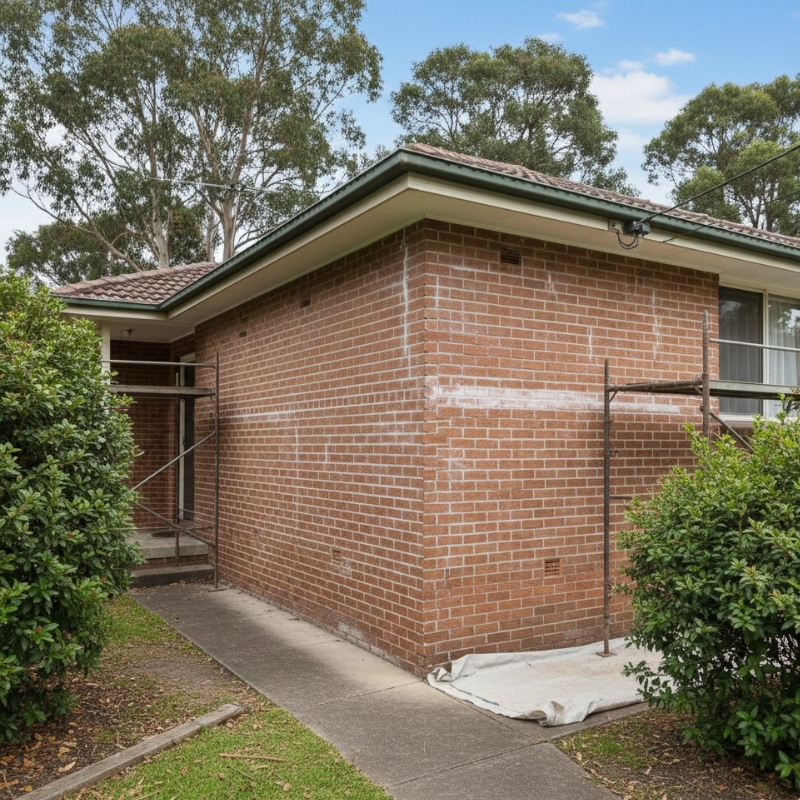
Visual signs of damp problems
Look for:
• Dark patches that remain after dry weather
• White, powdery deposits (efflorescence)
• Peeling or bubbling paint
• Green algae or mould growth
These signs can point to rising damp, water ingress, or moisture migrating through the wall from behind.
Simple checks homeowners can do
While professional testing may be needed, homeowners can still note:
• Whether damp areas worsen after rain
• If garden beds or soil are built up against walls
• Whether weep holes are blocked or missing
Rendering over unresolved damp is one of the most common causes of cracking and bubbling reported by rendering specialists in Liverpool, particularly in older brick homes with poor drainage.
Step 3: Assess existing paint, coatings, and finishes
Many Sydney homes have painted brick or blockwork, which can complicate preparation.
Can rendering be done over painted walls?
In some cases, yes—but only if the paint is stable and suitable. Loose, flaking, or glossy paint usually requires removal or mechanical preparation to ensure proper adhesion.
A simple tape test can help homeowners identify weak paint layers before rendering begins:
• Apply strong tape firmly to the surface
• Pull it away sharply
If paint comes away easily, the surface is not ready without further preparation.
Step 4: Be aware of risks in older Sydney homes
If your home was built before the late 1980s, extra care is needed during preparation.
Older exterior materials may include:
• Asbestos cement sheeting
• Textured coatings
• Lead-based paints
Disturbing these materials without proper handling can pose serious health risks. The NSW Government’s guidance on hazardous materials during home renovations explains how asbestos and other dangerous materials should be identified, tested, and managed safely before any work begins. Homeowners should review this guidance carefully before cleaning, grinding, or preparing exterior walls for rendering.
If there’s any uncertainty about what materials are present, preparation should pause until proper testing and advice are obtained.
Step 5: Clear access and protect surrounding areas
Preparation isn’t just about the wall itself—it also involves making the site safe and workable.
Before rendering preparation starts, it’s wise to clear:
• Outdoor furniture
• Potted plants
• BBQs and storage items
• Vehicles parked close to walls
Protect:
• Windows and doors
• External lights and fittings
• Garden beds and lawns
• Paving and decking
Homeowners who take time to prepare their surroundings often experience fewer delays and cleaner results throughout the rendering process.
Step 6: Factor in Sydney weather and timing
Sydney’s climate plays a major role in rendering outcomes.
Avoid preparing walls:
• Immediately after heavy rain
• During prolonged humid conditions
• In extreme heat without suitable curing plans
Walls must be allowed to dry thoroughly after cleaning or rainfall. Shaded walls, coastal exposure, and winter conditions can all extend drying times.
Understanding how the weather affects preparation is an important part of learning more about house finishes and materials. Many homeowners choose to learn more about house rendering before committing to major exterior work so they can make informed decisions about timing and expectations.
Step 7: Decide what must be fixed before rendering
Some issues should always be addressed first, while others may be managed during preparation.
Issues that usually need fixing first
- Active damp or water ingress
- Structural or widening cracks
- Loose or hollow masonry
- Failing paint or previous render
Issues that may be manageable during preparation
- Minor hairline cracking
• Small surface imperfections
• Cosmetic inconsistencies
Understanding this difference helps homeowners avoid assuming render will “solve” problems it isn’t designed to fix.
Step 8: Know when a professional assessment is sensible
Even with a detailed checklist, some conditions require further assessment before rendering proceeds.
You should pause and seek advice if:
• Cracks continue to widen
• Damp persists despite drainage improvements
• Large areas of wall sound hollow
• The home has unknown or layered coatings
Early assessment can prevent expensive repairs later and help ensure rendering is applied to a surface that can support it long-term.
Common preparation mistakes homeowners make
Avoiding these mistakes can significantly improve outcomes:
• Assuming render will hide defects
• Skipping moisture checks
• Rendering over unstable paint
• Ignoring early movement cracks
• Rushing preparation to meet deadlines
Preparation may feel time-consuming, but it’s far less costly than fixing a failed render.
Frequently asked questions
Can walls be pressure-washed before rendering?
Yes, but walls must be allowed to dry fully afterwards. Trapped moisture is a common cause of failure.
How dry should walls be before rendering?
Walls should show no signs of active damp. Drying time varies based on weather, exposure, and wall type.
Do I need council approval to render my house in Sydney?
Most homes don’t require approval, but heritage-listed properties or visible façade changes may need council sign-off.
Is rendering suitable for all wall types?
Most masonry walls can be rendered if properly prepared. Some substrates require specialised systems.
What’s the most common cause of render failure?
Inadequate preparation, particularly unresolved moisture and unstable surfaces.
Final pre-render checklist summary
Before rendering begins, confirm that:
• Walls are stable and sound
• Moisture issues are resolved
• Cracks are properly assessed
• Existing coatings are suitable
• Hazards are identified safely
• Access and protection are planned
• Timing suits Sydney conditions
Proper preparation protects both the finish and the long-term performance of the render.