Cracks in external walls can be unsettling, especially when you’ve invested in house rendering to protect the substrate, improve weather resistance, and lift street appeal. Because render is both a finish and a protective system, cracking isn’t just an appearance issue — it can affect how well the coating sheds water, how long your paint finish lasts, and whether small openings become pathways for moisture over time. In Sydney’s mix of strong sun, coastal air, and heavy rain bursts, learning to read crack types is one of the most practical homeowner skills for protecting rendered walls.
This guide explains the difference between hairline and structural cracks in render, why they show up in real-world house rendering systems, and what to do next — from simple monitoring to knowing when the pattern suggests movement or moisture that needs proper investigation.
First, what is “render cracking” actually telling you?
Render is a coating system. It’s designed to be durable, but it still sits on top of something else (brickwork, blockwork, fibre cement, AAC/Hebel, or other substrates). Cracking can happen in:
– The render coat itself (surface-level cracking)
– The interface between render and substrate (bond issues)
– The substrate or structure underneath (movement that telegraphs through the render)
The key is working out which of those is most likely, because the “right” fix depends on the cause. A quick patch can be fine for one crack type and a temporary band-aid for another.
Quick Q&A: Are cracks in render normal?
In many Sydney homes, small hairline cracks can appear over time due to drying/shrinkage, temperature changes, and minor building movement. What’s not “normal” is cracking that is rapidly getting worse, recurring in the same spot soon after repairs, or accompanied by water staining, damp smells, bulging, or a hollow “drummy” sound.
Structural cracks vs hairline cracks: the difference that matters
Hairline cracks (typically cosmetic)
Hairline cracks are usually thin, shallow, and don’t show clear signs of movement in the building. They often look like:
– Very fine lines (sometimes a “map” or “crazing” pattern)
– Short, scattered cracks on broad wall areas
– Light cracking at joints where different materials meet
– Minor cracking that doesn’t widen or lengthen over months
Hairline cracking is often linked to shrinkage as the render cures, minor thermal expansion/contraction, or small stresses at corners and junctions.
In-house rendering, the goal isn’t “never a crack ever” — it’s understanding which cracks are cosmetic within a coating system, and which cracks indicate conditions that can shorten the life of the render or paint finish.
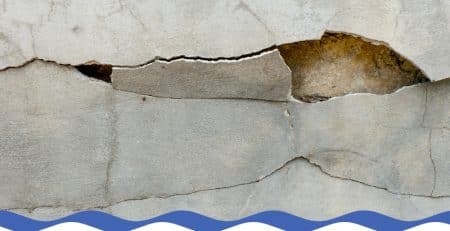
Structural cracks (potentially serious)
Structural cracks are less about the render and more about what the building is doing underneath. These may appear as:
– Wider cracks, especially if they’re widening over time
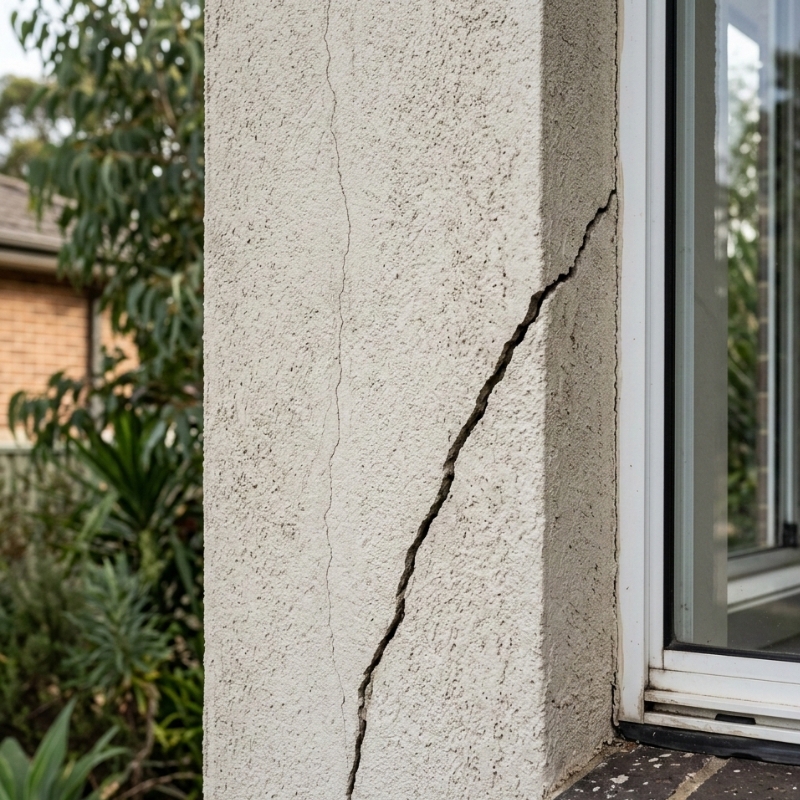
– Long diagonal cracks (often near openings like windows/doors)
– Step-like cracking that follows brick/block lines under the render
– Cracks that reappear quickly after “patch and paint” repairs
– Cracking associated with other symptoms (sticking doors, uneven floors, new gaps inside)
A structural crack doesn’t automatically mean “major disaster”, but it does mean you should treat it as a diagnostic problem first, not a cosmetic problem.
Quick Q&A: How wide is “too wide” for a render crack?
As a homeowner rule of thumb, the wider the crack and the faster it changes, the more important it is to investigate. Hairline cracking is usually fine to monitor and seal/repair at the surface. If you can comfortably fit the edge of a coin into the crack, or it’s noticeably widening, or it’s diagonal and long, it’s worth getting an experienced set of eyes on it.
Why render cracks happen (the most common causes)
Most cracking causes trace back to how the house rendering system was detailed, how it cured, and what the substrate is doing underneath.
1) Shrinkage during curing
Render contains cementitious materials and water. As it cures and dries, it can shrink slightly. If conditions are hot, windy, or the mix dries too quickly, shrinkage stresses can show up as hairline cracking, especially in large wall areas.
In Sydney, west-facing walls can cop strong afternoon sun, and coastal breezes can speed up surface drying. That combination can increase the chance of fine shrinkage cracks.
2) Thermal expansion and contraction
Materials expand and contract with temperature changes. Render is exposed directly to sun, shade, and daily temperature swings. Over time, repeated cycles can stress junctions, corners, and long unbroken wall runs.
This is one reason movement/control joints (sometimes called articulation joints) are so important on certain wall layouts.
3) Substrate movement (brickwork, blockwork, framing)
If the wall behind the render moves, the render can crack to “show” that movement. Causes can include:
– Normal settlement in newer builds
– Reactive soils and seasonal moisture changes
– Changes in drainage (new garden beds, leaking downpipes, pooling water)
– Structural alterations or vibration impacts
– Timber framing movement (especially around openings)
The important bit: if movement is ongoing, surface patching alone rarely holds up long-term.
4) Missing or poorly placed movement joints
Long walls, changes in materials, and stress points (like corners) often need correctly detailed joints to allow movement without cracking. When joints are missing, bridged over, or filled rigidly, cracks commonly form where the wall “wants” to move.
In practical terms, good joint design is one of the biggest differences between house rendering that ages gracefully and house rendering that needs repeat patching.
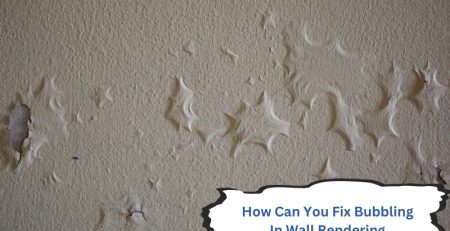
5) Water ingress and moisture pressure
Tiny cracks can let water in. That’s why render cracking matters in house rendering: even fine cracks can undermine the protective role of the rendered skin if water is repeatedly driven into the same spot. In Sydney’s heavy rain events, wind-driven rain can push moisture into hairline openings, especially on exposed elevations. Moisture behind render can lead to:
– Staining and efflorescence (white salts)
– Softening or deterioration of underlying materials
– Bubbling, drumming, or delamination in worse cases
– Mould/algae growth in shaded, damp areas
6) Poor adhesion or incompatible layers
If the render hasn’t bonded properly, or coatings are incompatible (for example, a rigid top coat over a more flexible base, or painting before proper curing), cracking and debonding can follow. Sometimes the crack is less a “movement” issue and more a “system compatibility” issue.
Where cracks appear tells you a lot
Around windows and doors
Openings are natural stress concentrators. Cracks that radiate from corners can happen when the wall moves, when detailing is weak, or when reinforcement is missing/insufficient. Diagonal cracks starting at window/door corners deserve closer attention than random hairlines in the middle of a wall.
Along with material changes
Where brick meets fibre cement, or rendered masonry meets lightweight cladding, movement rates differ. These junctions often need careful detailing and flexible sealing.
Near downpipes, garden beds, and leaking taps
Water problems often present as cracks plus staining, bubbling paint, or damp patches. If you see cracking directly below a gutter overflow point or near a downpipe that dumps water at the base of a wall, treat drainage as part of the fix.
On long, uninterrupted walls runs
Long walls without joints can build up stress and release it as cracking, especially in hot sun exposure.
Step-by-step: what to do when you notice a crack
Step 1: Don’t patch immediately — document it first
Before touching anything, take clear photos:
– A close-up with a ruler/coin for scale
– A mid-shot showing the crack’s full length
– A wide shot showing where it sits on the wall (near openings, corners, ground, roofline)
Write down the date and any recent events (big storms, heatwaves, renovations, plumbing issues).
Step 2: Do a simple “change over time” check
Mark each end of the crack lightly with pencil, or place small removable tape markers at key points and date them. Re-check after:
– A few weeks
– A heavy rain period
– A hot spell
If it’s stable, you’re usually dealing with a surface-level issue. If it’s clearly extending or widening, treat it as movement or moisture until proven otherwise.
Step 3: Check for moisture clues
Look for:
– Staining, paint bubbling, or salty white deposits
– Soft or crumbly areas
– Damp smells near internal walls
– Persistent algae/mould growth on the exterior
Moisture changes the priority. Even a small crack can matter if it’s acting as a water pathway.
Step 4: Do a gentle “tap test” for bond issues
Using your knuckles, lightly tap along the area. A solid, consistent sound is reassuring. A hollow, drum-like sound can suggest debonding (render separating from the substrate). If you suspect debonding, avoid aggressive DIY repairs that could trap moisture or hide a larger problem.
Quick Q&A: How can I tell if the crack is only in the render?
A practical clue is the pattern. Fine random hairlines, surface crazing, or very shallow cracks that don’t align with brick/block lines are more likely render-only. Step-like cracking or cracks that mirror masonry joints can indicate movement below. If unsure, monitoring plus a targeted inspection is safer than guessing.
When a DIY repair can be reasonable (and when it’s not)
DIY may be reasonable when:
– The crack is hairline and stable over time
– There are no moisture signs
– The render sounds solid (no widespread drumming)
– The crack isn’t a long diagonal starting at an opening corner
– You’re prepared to match materials and allow proper cure times
– You understand you’re maintaining the house rendering system (seal + compatibility + coating), not just “filling a line”
Stop and escalate when:
– The crack is widening or multiplying quickly
– There’s diagonal or step cracking that suggests movement
– Doors/windows nearby are sticking or misaligning
– There are damp indicators, bubbling, or recurring efflorescence
– Large areas sound hollow, or the render is lifting
If you want a Sydney-specific overview of what commonly drives cracking (from sun exposure to coastal moisture), this page on house rendering in Sydney provides useful context alongside what you’re seeing on your walls.
Common crack patterns and what they often mean
Map cracking/crazing
Looks like a fine “web” or map across an area.
Often linked to:
– Surface shrinkage during curing
– Overworking the surface
– Fast drying conditions
Usually cosmetic, but still worth sealing/painting correctly so water doesn’t exploit micro-openings.
Straight vertical/horizontal cracks
Often appear along stress lines or junctions.
Often linked to:
– Movement at joints
– Poor detailing where materials change
– Thermal stresses on long walls
Diagonal cracks from window/door corners
A classic “pay attention” pattern.
Often linked to:
– Stress concentration at corners
– Substrate movement
– Insufficient reinforcement or poor detailing
Step cracking that follows masonry lines
Often suggests the wall behind is cracking along mortar joints.
Often linked to:
– Structural movement
– Settlement or reactive soil effects
– Drainage changes and moisture cycling
Sydney-specific factors that can worsen cracking
Coastal exposure and salt air
In beachside suburbs, salt-laden air and strong winds can accelerate surface wear and create harsh wet-dry cycles. Salt can also contribute to efflorescence and paint breakdown, which can turn small cracks into ongoing maintenance points.
Heavy rain and wind-driven storms
Sydney can get intense bursts of rain that drive water sideways into small openings. That’s why “it’s only a hairline” isn’t always the end of the story if the crack sits on an exposed elevation.
Strong sun on western elevations
Render systems can heat up dramatically in the afternoon sun and cool quickly overnight. Repeated thermal cycling increases movement stresses, especially on dark paint colours.
A practical “what to do next” pathway
If it’s hairline and stable:
– Clean the area gently (remove chalking, algae, dirt)
– Use a suitable, compatible crack treatment (often flexible for micro-movement)
– Prime if required
– Recoat with an exterior-grade coating suitable for render
– Keep an eye on it through the next season change
If it’s larger, patterned, or around openings:
– Document and monitor first
– Check drainage and moisture sources (gutters, downpipes, garden beds, grading)
– Consider a targeted assessment to confirm whether the issue is render-only or substrate movement
– Repair using a method that addresses the cause (not just the symptom)
If you suspect it’s structural or moisture-driven:
– Prioritise investigation (movement and water pathways)
– Avoid sealing moisture into the wall with the wrong products
– Fix contributing factors like drainage first
– Use repair methods designed for movement where appropriate
For an authoritative benchmark on building tolerances and how cracking is often discussed in post-completion assessments, see the NSW Government’s Guide to Standards and Tolerances.
Q&A: What should I record if I’m monitoring cracks?
Record:
– Date first noticed
– Location (which wall, distance from a corner/opening)
– Approximate length and direction
– A photo with a scale reference
– Weather notes (big rain, heat spikes)
– Any changes inside (new sticking doors, new internal cracks)
This helps you spot trends, and it also makes any later conversations far more productive.
Q&A: Can water get behind hairline cracks in render?
Yes, it can. Not every hairline crack becomes a leak pathway, but in exposed conditions (wind-driven rain, repeated wetting, shaded walls that stay damp), tiny openings can let moisture track behind the coating. The risk is higher if paint or topcoats are already failing, or if the wall has other moisture contributors (poor drainage, leaks, rising damp influences).
Q&A: Why do repaired cracks sometimes come back?
Common reasons:
– The underlying movement wasn’t addressed (the wall is still moving)
– A rigid repair material was used where flexibility was needed
– Moisture is present behind the render
– Joints were missing or bridged over
– The repair wasn’t keyed/prepped correctly, so it didn’t bond well
– Paint was applied too soon or wasn’t compatible with the render system
If you’re stuck in a repeat-repair cycle, it’s usually a sign that the cause needs to be identified more clearly. This is where getting help with cracked render (in the form of proper diagnosis and a plan) becomes more valuable than trying a new filler each time.
Preventing future cracking: what helps most
You can’t prevent all cracking forever, but you can reduce the odds of recurring problems:
– Keep gutters and downpipes functioning and discharging away from walls
– Avoid garden beds piled high against rendered walls unless they’re designed for it
– Maintain protective coatings so water doesn’t exploit micro-cracks
– Watch west-facing elevations for early paint breakdown
– Treat algae/mould early to avoid persistent dampness
– Make sure repairs use compatible products and allow correct cure times
– Take recurring diagonal/step cracking seriously and investigate the cause
If you want a clearer baseline on materials, finishes, and what “normal” movement can look like over time in a house rendering system, understanding house rendering is a helpful companion to the prevention steps above.
FAQ
Are hairline cracks in the new render a defect?
Not always. Fine shrinkage cracking can occur as the render cures, particularly in hot/windy drying conditions. What matters most is whether the cracking is stable, limited, and not linked to moisture or ongoing movement.
Should I paint over cracks in render?
Painting over cracks without treating them first often leads to the crack “ghosting” back through, or allowing water entry behind the paint film. Crack preparation and compatible coatings matter.
What if the crack is only on one side of the house?
That can point to exposure differences (western sun, prevailing rain) or localised factors like drainage, shade, or a specific opening detail. Compare elevations and check downpipes, garden beds, and roof runoff points on that side.
Are diagonal cracks always structural?
Not always, but they’re more concerning than random hairlines, especially if they start at window/door corners or are increasing over time. Treat them as a “check this properly” signal.
What does “drummy” render mean?
A hollow sound when tapped can suggest render has debonded from the substrate. That can be linked to moisture, poor adhesion, or incompatible layers. It often needs more than a surface patch.
How long should I monitor a crack before acting?
If there’s no moisture and no other symptoms, a few weeks to a couple of months (including a rain period and a temperature swing) can reveal whether it’s stable. If it’s changing quickly, don’t wait.