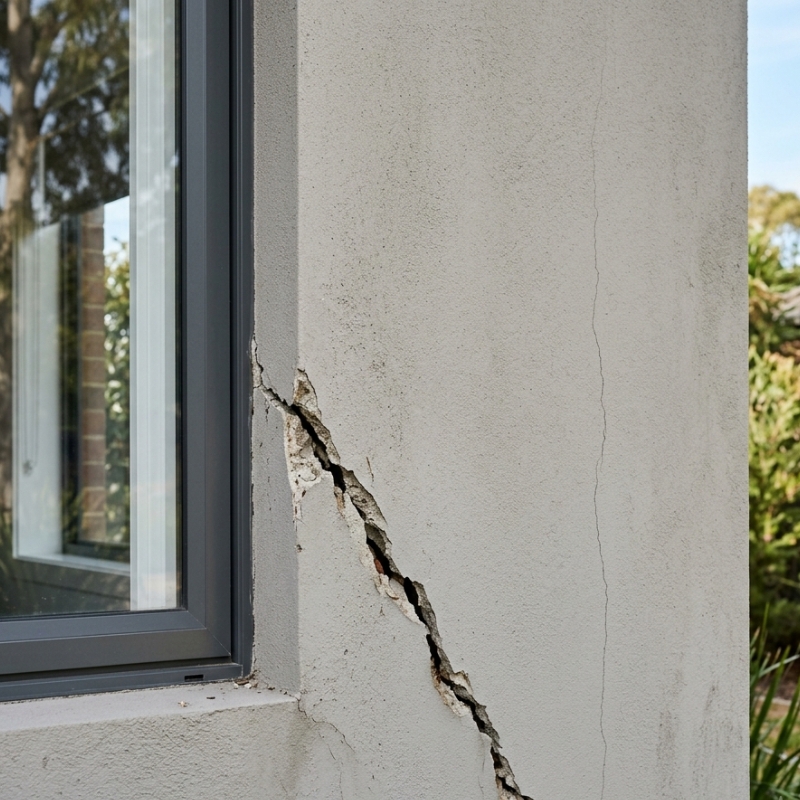
What Makes Rendered Walls Crack
No rendered wall is completely immune to cracking. The render itself shrinks a little as it cures, bricks and blocks expand or contract with temperature swings, and Sydney’s mixed clay soils can move after a run of wet months. Those routine shifts usually cause tiny fissures that barely catch the nail of your index finger.
If the underlying masonry is solid, a touch-up and repaint is often enough. When the substrate moves, however, the crack can reopen, widen or spread on the diagonal. That pattern hints at deeper movement inside the wall or the footings below it.
The difference between a cosmetic blemish and a structural warning sign matters because the repair approach, cost and urgency change dramatically. A quick skim coat can disguise a hairline flaw, while a load-bearing failure calls for reinforcement before any re-rendering starts. For homeowners weighing up the next steps, understanding when expert wall crack repairs may be needed can help avoid unnecessary work and ensure the right solution is chosen.
Reading a Hairline Crack
Hairline cracks are usually less than 0.2 mm wide. You may notice them only when sunlight rakes across the wall or fresh paint highlights the line. Typical features include:
- A straight or gently undulating path across the render
- Consistent width along its length
- No continuation through mortar joints or brick faces underneath
- Dry, clean edges free of dust or salt crystals
These cracks often arise within the first year after rendering as the mix loses moisture. They can also form beside windows where two different materials meet. In most cases a flexible exterior filler, light sanding and a quality membrane paint halt further movement. Catch them early and they can often be bundled into a routine repaint schedule.
Red Flags That Point to Structural Movement
A crack becomes “structural” once it signals movement in masonry, framing or foundations rather than the render skin alone. Warning signs tend to appear in clusters:
- Width exceeds 2 mm—two 10-cent coins side-by-side can fit in the gap
- The opening widens or lengthens over a single season
- Edges feel stepped, as though one side has shifted forward or sunk back
- The line traces mortar joints in a zig-zag or runs sharply from corner to lintel
- Moisture stains, rust marks or efflorescence appear along the fracture
Diagonal cracks above doors or windows can hint at lintel failure, while vertical splits that start at roof level and creep downward often suggest footing settlement. Movement might stem from reactive clay swelling, tree root intrusion, leaking stormwater pipes or ageing footings that no longer distribute loads evenly.
Left unchecked, these cracks compromise weather tightness, invite termites through hair-thin gaps in damp timber framing and, in extreme cases, weaken the wall’s ability to support the roof. Insurance policies frequently exclude gradual damage, so documenting crack progression and acting early protects both safety and resale value.
At-Home Checks Worth Trying First
Before calling in a professional, homeowners can run simple, low-cost tests to gauge urgency:
Measure the gap with digital callipers or slip a feeler gauge into the widest point and record the date and width. Repeat each month for three or four months. A stable reading suggests a cosmetic crack; a steady uptick signals live movement.
Take high-resolution photos from a fixed distance. Mark reference points—brick courses or window frames—so repeat shots reveal subtle spreading. Match the lighting conditions each time for accuracy.
Tap either side of the crack with the plastic end of a screwdriver. A dull thud on one side and a clear ring on the other can indicate render debonding, where the skin has lifted from the masonry but the bricks remain sound.
Check gutters and downpipes nearby. Overflowing gutters funnel water down a single wall panel, softening the render and mortar. Clearing a blockage often stops a hairline imperfection from worsening.
For a deeper dive into practical maintenance, see our earlier piece on wall crack prevention and repair, which covers inspection calendars and moisture management.
Professional Assessment: What to Expect
Bringing in an expert does not always mean a hefty repair bill is around the corner. A licensed renderer will:
- Map cracks using a mirror and torch to see whether they stop at window reveals, turn corners or pass through to internal plasterboard.
- Tap the render systematically to find hollow patches needing re-keying.
- Check sub-floor ventilation and moisture meter readings—anything above 15 per cent is high enough to degrade timber and mortar.
- Suggest non-destructive monitoring, such as crack gauges epoxied across the gap, for borderline cases.
Where footing settlement is suspected, an engineer may call for soil tests or ground-penetrating radar. Those reports drive decisions such as underpinning, installing helical wall ties or replacing failed lintels before cosmetic render work begins.
Sydney councils generally require a Development Application only when works change the building envelope. Local render repairs that don’t alter structure usually proceed under exempt development rules, yet each suburb sits on slightly different planning overlays. Checking the relevant LEP (Local Environmental Plan) avoids compliance headaches later.
For definitions of building defect categories and homeowner obligations, the NSW Government provides clear guidance in its building problems resource.
Putting a Plan in Place
Once the extent of movement is clear, sequencing matters:
- Stabilise first. Address drainage, footing or lintel issues before touching the render.
- Choose compatible repair products. Flexible polymer-modified render over a fine stainless-steel mesh accommodates minor future movement far better than a brittle sand-cement skim.
- Colour-match carefully. New acrylic membranes can be tinted to existing paint codes, but age and UV exposure fade pigments. A full-wall or whole-elevation repaint often hides the repair line more convincingly than spot fixes.
- Track results. Keep earlier measurements and photos, then take fresh readings six months post-repair to confirm stability.
Acting promptly on early-stage cracks usually costs a fraction of late-stage structural remediation. More importantly, it protects occupants from moisture ingress, loose render falls and the stress of urgent foundation works.
Understanding the story a crack tells helps homeowners separate harmless blemishes from genuine threats. Hairline lines seldom spell disaster, yet monitoring them and ruling out underlying movement is wise. Structural cracks, by contrast, call for calm, methodical investigation and staged repair—never a quick plaster and paint. With regular self-checks and timely professional input, Sydney property owners can keep rendered walls both good-looking and load-bearing for decades to come.