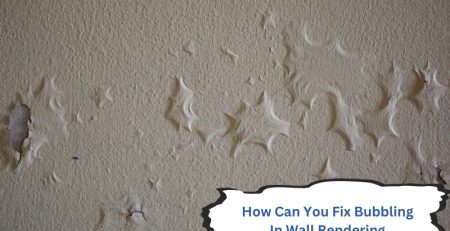
A fresh render finish boosts street appeal and weather protection, but Sydney’s stop-start rain, salty coastal air and strong summer UV can take a quiet toll on those good looks. Small patches of dirt, hairline cracks or chalky streaks might not seem urgent, yet they are early indicators that moisture or sunlight is starting to break the protective skin. Staying on top of minor upkeep stops cosmetic blemishes turning into bigger repair bills, helps paint and top coats last longer, and protects the building fabric underneath. The calendar below sets out simple checks you can do at the start of each season. If you notice problems that keep coming back, or you are unsure whether a blemish is harmless, you can always seek professional house rendering advice before the issue escalates.
Why Seasonal Maintenance Matters in Sydney’s Climate
Sydney enjoys a mild temperate climate, yet the combination of high summer UV, coastal salt spray, humidity swings and occasional storm cells places unique stresses on exterior finishes. Render is designed to breathe and flex with temperature changes, but constant expansion, contraction and wind-driven rain gradually open micro-cracks. Checking the walls at the same time you change the clocks or clean the gutters helps you:
- Catch cracks while they can still be spot-repaired.
- Wash off mould spores before they etch stains into the surface.
- Re-seal joints and control joints before moisture seeps behind the render layer.
- Plan any repainting or top-coat work during the most stable weather windows.
Local weather at a glance
According to the Bureau of Meteorology climate data, Sydney collects roughly two-thirds of its annual rainfall between February and June, while UV indexes peak from November to February. Those patterns underpin the maintenance calendar that follows.
At-a-Glance Seasonal Care Table
A quick reference before we dive into detailed tasks.
| Season | Key Weather Pressure | Quick Checks | Suggested Action if Issues Found |
| Summer (Dec-Feb) | Extreme UV, afternoon storms, high humidity | Look for chalky residue, colour fade, salt crystals on coastal walls | Gentle wash, monitor colour change, schedule repaint if chalking worsens |
| Autumn (Mar-May) | Heavy rainfall peaks, falling leaf debris | Inspect for hairline cracks, clogged weep holes, damp stains | Seal minor cracks, clear debris, confirm gutters divert water away |
| Winter (Jun-Aug) | Cooler temps, wind, lower UV | Check for brittle sealant at joins, condensation marks in shaded areas | Replace failing sealant, improve ventilation, plan render touch-ups for spring |
| Spring (Sep-Nov) | Rapid warming, dry westerlies | Scan for new movement cracks from thermal expansion | Fill non-structural cracks, book professional assessment if diagonal or widening |
Following the table, let’s break down the tasks season by season with practical how-to guidance.
Summer: Protecting Render from Sydney’s UV and Storm Bursts
Sydney’s summer UV Index often climbs above 10. On paler acrylic coatings that can speed up colour fade, while dark mineral renders can over-heat and micro-fracture. Sudden afternoon storms then force moisture into those weakened pores.
Key tasks for December to February
- Gentle exterior wash.
• Use a soft brush and mild detergent.
• Avoid high-pressure sprays that can force water behind the render. - Inspect colour consistency.
• Run a clean hand over the wall. If you see white powder (known as chalking), the top coat is oxidising. - Look for salt deposits near coastal suburbs.
• White crusty spots can signal salt crystals absorbing moisture, which later expand and break the finish. - Confirm expansion joints are clear.
• Flexible joints stop thermal cracking. Clear out any sand or paint build-up.
If chalking or salt frosting affects a large area, plan a repaint or specialist clean in autumn when humidity is lower, and paint cures better.
Autumn: Heavy Rain Means Crack Patrol
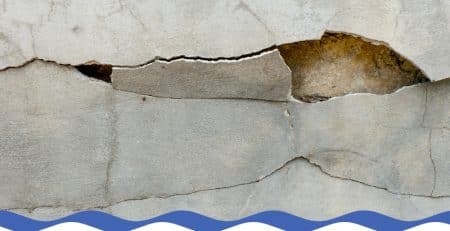
From March to May, Sydney can receive up to 400 mm of rain in some months. Saturated render can swell, then shrink when the sun reappears, creating fine step-like cracks or “leaching” streaks.
Key tasks for March to May
- Check hairline cracks after each significant downpour.
• Use a torch across the wall to highlight very fine lines.
• Mark the ends with a pencil to see if they grow. - Clear gutters and downpipes.
• Overflowing water runs down walls and drives moisture behind render edges. - Inspect damp stains or efflorescence.
• White bloom indicates moisture exiting through the wall, carrying salts. - Clean weep holes at brick ledges.
• Blocked weep holes trap water in the cavity and push damp outward.
Minor static cracks (under 1 mm, not widening) can be cleaned out and filled with a breathable acrylic sealant. Recurring or widening cracks, especially diagonal ones around windows, suggest movement and deserve closer attention in line with what causes cracks in rendered walls.
Winter: Sealant and Condensation Watch
While Sydney winters are milder than southern capitals, night temperatures still dip low enough for dew and condensation on cold wall faces. Render edges around windows and control joints can stiffen, allowing water to penetrate.
Key tasks for June to August
- Inspect flexible sealant at joints.
• If it feels brittle or has separated from the wall, cut it out and replace it on a dry, still day. - Check the shaded southern walls for mould.
• Black or green patches must be treated with a mould-kill solution, not just water. - Ventilate interior spaces.
• Persistent interior condensation can migrate outward and stain the render. - Review any patch repairs done in autumn.
• Make sure fillers have cured without shrinking.
Winter is also a strategic time to obtain quotes for larger remedial works, giving you the first choice of spring installation slots.
Spring: Expansion Cracks and Pre-Summer Protection
From September, temperatures climb fast, and westerly winds strip moisture. Render suddenly expands and contracts more each day. That can reveal cracks that were hidden through winter.
Key tasks for September to November
- Walk around the property with binoculars if you have a two-storey home.
• Look for vertical or diagonal cracks running from window corners or parapet walls. - Check previous repairs.
• Make sure sealant hasn’t pulled away as temperatures rise. - Plan top-coat works.
• Spring’s lower rainfall and moderate temperatures give the best curing conditions. - Apply hydrophobic protective coatings if near the coast.
• Clear silane/siloxane treatments repel water while letting moisture escape.
If new cracks are wider than a credit-card edge, or if you see bulging render, stop and arrange a professional inspection before summer storms test the envelope again.
Common Mistakes to Avoid During DIY Render Care
Even well-intentioned maintenance can damage a finish. Keep these pitfalls in mind:
- Excessive pressure washing can blow render off porous masonry.
- Painting over trapped moisture locks damp inside the wall.
- Ignoring small chalky patches lets UV damage spread underneath.
- Using rigid fillers in flexible control joints creates stress points.
- Filling recurring diagonal cracks without investigating causes may hide structural movement.
Spot repairs can save money, but only when the underlying cause is understood.
When to Monitor, Repair or Call a Professional
Not every blemish needs urgent trade help, yet some do. The quick matrix below can help you decide.
| Issue | Likely Cause | Safe DIY Action | When to Seek Professional Help |
| Fine static hairline crack <1 mm | Minor shrinkage, weathering | Clean and apply breathable sealant | If crack lengthens or new cracks appear nearby |
| Chalking or fading paint | UV breakdown | Clean gently, consider repainting | If render underneath feels powdery or hollow |
| Efflorescence streaks | Moisture migration | Brush off salts after wall dries | If salts keep reappearing, moisture source needs attention |
| Diagonal or stepped crack >1 mm | Possible footing movement | Monitor width with gauge | Rapid widening, water ingress or visible bulge demands assessment |
| Hollow-sounding patch | Adhesion failure, trapped water | Leave untouched until dry, then tap test | Professional repair before the patch falls off |
Frequently Asked Questions
1. How often should I wash my rendered walls in Sydney?
Aim for a light wash once a year, usually at the start of summer. If you live in a coastal suburb, twice-yearly washes help remove salt spray that accelerates surface breakdown.
2. Can I use a high-pressure cleaner on acrylic render?
It is safer to avoid high-pressure jets. Use a soft brush or low-pressure setting under 1,000 psi, keeping the nozzle at least 500 mm from the surface to prevent water penetration.
3. What is the white powder on my render after rain?
That white powder is typically efflorescence—salts left behind as moisture exits the wall. One-off occurrences can be brushed away, but recurring patches signal moisture inside the substrate that requires investigation.
4. Do hairline cracks always need repairing?
Stable hairline cracks under 1 mm wide can often be monitored. If they widen, spread, or allow moisture in, seal them promptly to stop water reaching the core render layer.
5. Is it okay to repaint the render in winter?
Sydney winters stay above 10 °C on most days, but cool nights and dew can slow curing. Spring delivers drier air and more stable temperatures, giving better adhesion and colour consistency.
Final Thoughts
A simple seasonal check takes less than an hour four times a year, yet it can extend the life of your render by many seasons. Walk around after big weather changes, keep gutters clear, wash off grime before it etches the surface, and address small cracks promptly. If you notice recurring damp, widening gaps or anything that feels beyond a quick patch, a trained renderer can inspect and advise on the best long-term fix. Staying proactive keeps costs down and your Sydney home looking sharp.