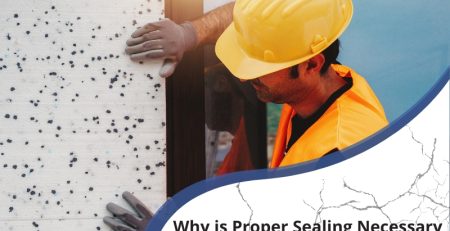
From Bronte’s salty sea breezes to the crisp winter mornings in Penrith, Sydney homes put their exterior materials through plenty of weather extremes each year. Polystyrene cladding is prized for its light weight, insulation and modern rendered finish, yet temperature swings, UV exposure and seasonal moisture can still undermine its long-term performance if basic upkeep is skipped.
This guide walks you through a practical, season-based care routine that keeps polystyrene panels sealed, dry and energy-efficient all year round. You will find simple visual checks, surface-safe cleaning techniques and warning signs to watch for. If you come across installation issues that look more than cosmetic, the safer next step is to arrange professional polystyrene cladding support before minor gaps or damp spots spread behind the surface.
Why Sydney’s Climate Demands Seasonal Attention
Sydney sits in a humid subtropical zone, which means:
- High summer temperatures can push the surface of light-coloured render close to 50 °C on full-sun days.
- Intense UV accelerates surface chalking and breaks down unprotected sealants.
- Sudden southerly storms often dump heavy rain after long dry spells, driving water into any open joints.
- Winter brings overnight lows near 0 °C in the west, allowing condensation to linger on south-facing walls well into the day.
Polystyrene’s closed-cell structure resists bulk moisture reasonably well, but once water or mould spores find a pathway, the panel can degrade and the adhesive bond to the substrate may fail. Small seasonal tasks done at the right time cut off those pathways early.
How Heat, UV and Moisture Affect Polystyrene Cladding
Sydney’s hotter months raise two main risks:
- UV-Driven Surface Breakdown
Intense UV attacks acrylic and cement-based finishes. Over time, the protective coating thins, hairline crazing appears and colour fades unevenly. - Thermal Expansion at Joints
Foam panels expand slightly under heat. If the initial installation left joints too tight or omitted expansion beads, pressure can cause fine cracks or pop the render along vertical lines.
Winter’s cooler and wetter pattern flips the risk profile:
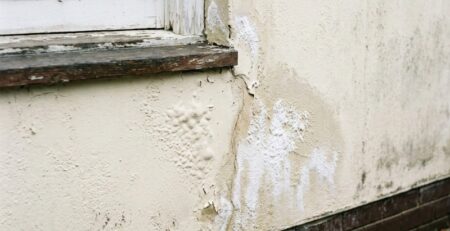
- Prolonged Surface Damp
Shaded walls stay wet longer, boosting the chance of mould staining and algae growth that feed on airborne pollutants. - Condensation in Cavities
Warm indoor air meeting a cold outer skin can cause moisture to form behind panels, especially where vapour barriers are missing or breached.
Seasonal Maintenance Checklist at a Glance
The table below summarises priority tasks for Sydney’s main weather phases. A deeper explanation of each task follows in the next sections.
| Season | Key Focus | Quick Checks | Recommended Action | Frequency |
| Summer (Dec – Feb) | UV & heat | Fading render, drying sealant, expansion gaps | Wash down walls, top-up UV-resistant sealer, re-caulk any movement joints | Annually, mid-summer |
| Autumn (Mar – May) | Storm prep | Blocked gutters, loose flashings, cracked render lines | Clear drainage, refix flashings, patch minor cracks before heavy rain | Annually, early autumn |
| Winter (Jun – Aug) | Damp & mould | Green staining, dripping weep holes, musty smell indoors | Soft-wash shaded walls, check sub-floor vents, improve indoor ventilation | Annually, mid-winter |
| Spring (Sep – Nov) | General tune-up | Fine settlement cracks, insect nests, dirt build-up | Full facade inspection, touch-up render, remove nests before hatch season | Annually, early spring |
Regular visual sweeps between seasons take only minutes yet often reveal small issues before they escalate.
Summer Care: Combating Heat and UV
Sydney’s scorching nor’westers can make rendered polystyrene feel hot enough to fry an egg. Repeated heat cycles expand and contract both the foam core and the cementitious render, stressing connection points.
Inspect and Refresh UV-Protective Coatings
Many acrylic topcoats last 8–10 years under Australian sun, but harsh coastal UV can cut that in half. Look for:
- Dull or chalky texture when you rub the surface with a fingertip
- Patchy or blotchy colour, especially on north-facing walls
- Tiny star-shaped craze lines under bright light
If two or more signs appear, wash the wall with a garden hose and soft broom, allow to dry, then roll on a compatible UV-resistant maintenance coat. Follow the manufacturer’s minimum curing temperature; most specify above 10 °C, which Sydney easily meets in summer.
Check for Thermal Movement Cracks
Hairline vertical cracks around 0.3 mm wide often develop where panels butt together. Use a credit card edge: if the crack disappears under gentle pressure, it is likely surface-level. Mark the ends with painter’s tape, then recheck in a month. A widening gap suggests movement joints were undersized or sealant has hardened. Cut out brittle sealant, inject a high-elasticity exterior caulk and trowel smooth.
Clean Off Salt and Pollution
Coastal suburbs from Manly to Cronulla collect airborne salt crystals that hold moisture against the surface. A low-pressure hose and neutral pH exterior cleaner lift salt without damaging the render. Avoid acidic brick cleaners; they etch the coating.
Autumn Preparations: Ready for Storm Season
Sydney averages 120 mm of rain in March alone. Driving rain finds any weakness in cladding joints and roof-to-wall flashings.
Clear Roof and Wall Junctions
Blocked box gutters or downpipes overflow and back-wash down exterior walls, keeping the render wet for hours. Autumn’s mild days are perfect for:
- Scooping leaf litter from gutters
- Flushing downpipes with a hose to confirm free flow
- Checking diverters that discharge to ground away from polystyrene walls
Secure Flashings and Trims
Metal flashings above windows stop wind-driven rain from entering the cavity. Look for lifted edges, missing fixings or rust streaks. Treat rust spots with zinc-rich primer and repaint to prevent staining the render below.
Patch Minor Render Damage
Use a flexible acrylic patching compound on:
- Chips from ladder knocks
- Pinholes around fixings
- Hairline stair-step cracks following brick joints behind the panel
A smooth autumn application cures well before winter damp sets in.
Winter Watch: Managing Damp and Condensation
Western Sydney nights can drop below 5 °C, cooling external walls and inviting condensation behind any unsealed breach. Prolonged surface damp also feeds algae and black mould on cooler south-facing walls.
Gentle Soft-Wash for Mould and Algae
Mix a bucket of warm water, a capful of exterior mould cleaner and a tablespoon of dish soap. Apply with a soft nylon brush from the bottom up, leave for 10 minutes and rinse gently. High-pressure washers can drive water between joints and void warranties; stick below 500 psi if you must rinse under pressure.
Check Ventilation Paths
Blocked weepholes or sub-floor vents trap moisture. Use a torch to scan vents; clear spider webs and leaf debris with a small brush. Ensure external soil is at least 75 mm below the lowest render line to prevent rising damp.
Monitor Indoor Humidity
Condensation on interior window glass suggests high indoor humidity. Run a dehumidifier or encourage cross-ventilation on sunny winter days to reduce vapour reaching cool exterior walls.
Spring Tune-Up: Repair Minor Cracks and Surface Wear
Spring’s drier conditions are ideal for general repairs that need mild temperatures.
Full Facade Inspection
Walk around the house with binoculars and a notepad:
- Note any new cracks or bulges in render.
- Look for insect activity: paper wasps often nest behind loose trims.
- Check paint or render edges where garden tools might have chipped the surface.
Touch up thin cracks with colour-matched render patch. Larger or repeating cracks may hint at cavity moisture; cross-reference with the warning signs of moisture behind cladding before deciding on the next action.
Remove Insect Nests Early
Mud-dauber nests and spider webs trap dirt and stain lighter finishes. Soft-brush them off before spring hatchlings emerge.
DIY Monitoring vs Professional Assessment: How to Decide
| Situation | Likely Severity | Safe DIY Action | When to Call a Professional |
| Fine, non-widening hairline cracks under 0.3 mm | Mostly cosmetic | Mark ends, photograph, recheck in 30 days | Crack widens, secondary cracks appear |
| Slight colour fading on north wall | UV ageing | Clean and apply maintenance coat | Blotchy patches after repaint, coating peels |
| Mould on shaded lower walls | Surface growth | Soft-wash with mould cleaner | Recurs within weeks, musty smell indoors |
| Sealant pulling away at windows | Potential water ingress | Re-caulk with exterior-grade sealant | Gap extends behind render or framing feels damp |
| Hollow tapping sound over large area | Detachment risk | None | Arrange a pull-off test and remedial fix |
If any issue falls in the professional column, gather photos, measurements and dates. This record speeds up diagnosis and reduces exploratory work.
Common Maintenance Mistakes to Avoid
- Using high-pressure washers above 500 psi that erode the render coat.
- Applying solvent-based paints that trap vapour and cause blistering.
- Ignoring small gaps at fixtures like pergola posts, where water can track behind panels.
- Relying on silicone alone without a backing rod in joints wider than 6 mm.
- Covering weep holes with garden beds or paving and blocking the drainage path.
Official Guidance and Product Compatibility
The Australian Government’s YourHome wall cladding guide notes that foam-based systems need compatible breathable coatings and correct joint detailing to prevent moisture entrapment. Always match patching compounds, primers and membrane coatings to the original system to keep manufacturer warranties intact.
Frequently Asked Questions
1. How often should polystyrene cladding be repainted in Sydney?
Most acrylic render topcoats last around a decade in Sydney’s UV conditions. Coastal homes facing direct salt spray may need a refresh closer to every 6–7 years. Check for chalky residue, fading or fine cracking to time your next coat rather than relying only on the calendar.
2. Is mould on the render itself harmful to the foam panel beneath?
Surface mould usually grows on pollutants or organic dust caught on the render, not the foam core. However, untreated growth traps moisture, which can seep through hairline cracks. Removing mould promptly keeps the underlying panel dry and healthy.
3. Can I drill into polystyrene cladding to hang outdoor lights?
You can, provided you use the correct masonry or timber fixing that reaches the structural frame behind the panel, then seal the penetration with exterior-grade sealant. Never leave raw holes; moisture will track straight into the foam.
4. Does polystyrene cladding attract termites?
Expanded polystyrene is not a food source for termites. The main risk is hidden entry points created if panels sit too close to soil or garden beds. Maintain the 75 mm inspection gap and keep weep holes clear to deter subterranean pests.
5. What is the safest way to remove graffiti from rendered polystyrene cladding?
Start with a biodegradable graffiti remover designed for painted masonry. Test a small area first. Gently scrub with a soft brush, rinse at low pressure and re-seal the spot if the topcoat dulls. Avoid solvent-heavy cleaners that can soften acrylic render.
Wrapping Up
Polystyrene cladding rewards regular, low-effort care. A quick seasonal routine—summer UV checks, autumn storm prep, winter mould control and spring crack repairs—prevents minor problems from turning into expensive moisture damage. Keep photos and notes as you go, so changes stand out next time you walk the perimeter. When something looks beyond basic DIY, professional advice can save both the cladding system and your energy bills for many years to come.